
10 Steps to Safely Handling Failed Parts for Laboratory Testing
Getting Ready for Laboratory Testing
So your pipe burst, your pump shaft snapped, or your welded joint split, and you need to figure out why and how to fix it. The next steps you take can make the difference between finding answers and leaving the mystery unsolved until the next failure.
Before you begin cutting up the leaky portion of pipe, removing that fractured valve, or digging out that broken bolt, there are a few measures you should take to preserve essential information valuable for assessing the failure. Proper preservation of the specimen is the foundation for finding a solution to your problem.
Step 1: Get the ‘Forensic Boys’ Involved Early
As in any good detective show on TV, it’s best not to touch anything until the ‘forensics boys’ get involved. If components are not handled properly, irreversible data loss might result. To avoid problems, consult with a metallurgical failure analyst as soon as possible. They can walk you through the steps necessary to properly remove the failed part without further damage. Get them involved quickly since leaving damaged components lying around typically leads to further damage.

For example, those cut steel tubes with the leak site will corrode sitting outside once the relative humidity gets above around 70%, which in some parts of the U.S. is pretty much every day. Things can go from bright and shiny to rusty very quickly, contaminating and damaging the failed part, making analysis less conclusive.
Step 2. Take Lots of Pictures In & Around the Failure
Photos are essential for documenting and comprehending what occurred. Before moving anything, take photographs of the failure, as shown in Figure 1. If you don’t have a camera, use the one on your phone. If the environment is dimly lit, use your camera’s or phone’s flash or a flashlight to illuminate the scene.
Check that the camera is configured to take high-quality photographs. Take images from various perspectives, both far away and close up. It’s also a good idea to include something to indicate scale in the images - ideally, a ruler, but a pen or your thumb would suffice.

Step 3. Collect Any Relevant Fluids, Residue, Deposits & Rust
Often, gathering a sample of leaking fluids, grease residue, or corrosion debris to analyze as part of the investigation is beneficial. Keep scraping to a minimum while acquiring this evidence from the site so that no more harm is caused. Damage caused by scraping could be misinterpreted as an aspect of failure. And don’t forget to wear gloves so that you don’t contaminate the part with your dirty hands!
Fluids, rust fragments, and oils, for example, should be placed in dry, clean plastic Ziploc bags or dry, clean water bottles, plastic cups, or aluminum foil for transportation, as shown in Figure 2. Furthermore, the lab may be able to assist you with sample collection. Take care to double bag samples to prevent leaks during shipment.

Step 4. Protect the Parts from More Damage
After photographing the failing item and collecting any helpful residue, look for ways to protect it from future damage.
Consider shifting the sample to a dry storage room, if it is small enough and does not smell. Why? Well, as we mentioned earlier, steel will begin to corrode if the relative humidity exceeds 70%. As a result, placing it beneath a cover in the laydown yard is insufficient to protect essential fracture features from damage, as shown in Figure 3.
If the sample is small enough, use clean compressed air to gently dry the pieces before storing them in plastic bags with a desiccant to preserve the sample.
Step 5. Don’t Clean ANYTHING
For a successful failure analysis, ideally the cracked part or leaky pipe must arrive at the lab in the same condition as when it failed. Cleaning a failing part that requires analysis is one of the worst things you can do. This is because cleaning might irreparably remove tiny fracture features (smaller than a human hair) that are required for analysis. Furthermore, cleaning chemicals contaminate the fracture, making it difficult to determine whether any exposed chemicals contributed to the failure.
Definitely avoid cleaning parts with wire brushing or grit blasting. However, if the components have been exposed to hazardous chemicals, they may need to be cleaned before they can be safely handled! Nevertheless, consult with the lab ahead of time for help. Always talk to the lab beforehand to get guidance.
Step 6. Don’t Touch the Fracture Surfaces
Try to avoid too much handling of fracture faces. Touching a fracture face leaves behind organic and inorganic residue, hair and fibers, salt from your french fries, and grease, all of which are contaminants that can make pinpointing the underlying cause difficult.
Furthermore, avoid reassembling the two halves of any fracture surface. Even the slightest touch between the mating fracture surfaces might result in significant damage to the tiny features. Failure analysts frequently examine fracture features measuring 5-10 microns in size. To put that in perspective, a human hair is around 80 microns in diameter. When you start clanking the two sides of the broken shaft together, you can understand how easily these features will be damaged.

Step 7. Cut it Down to a Manageable Size
Check to find out what sample size the lab prefers for analysis. Often, the lab does not require the whole pipeline or shaft—only the region of interest (e.g., the leak location). There may also be constraints to what they can safely handle for analysis, which might require you to cut items to a more manageable size for them. A smaller sample is also less of a headache for you to ship!
When any failed components must be cut, either for extraction or transportation, extreme caution is essential. Excessive heat during cutting can severely damage a component, resulting in an inaccurate assessment of the metal’s condition. Carbon steels, for example, can suffer a drop in mechanical properties when exposed to temperatures as low as 500°F.
Try to cut using a portable bandsaw or a hacksaw since they produce the lowest amount of heating. It is best to avoid utilizing abrasive cut-off wheels or plasma/flame cutters since they generate a lot of heat when cutting. To avoid heat damage, it is essential to stay at least 6 inches away from the fracture/leak location. One approach for detecting heat on the sample during cutting is to use a non-contact infrared thermometer, as shown in Figure 4.
A decent ‘rule of thumb’ is that if you can easily touch the region of interest with your thumb while it’s being cut out, the metal isn’t overheating. If the metal becomes too hot to touch, it may become heat-damaged, and you should begin cutting further away. If feasible, cut the metal dry to avoid introducing contamination. However, if you cannot cut it dry, then apply a continuous water stream on the cut area and dry the part immediately after cutting with compressed air.
Step 8. Protect the Parts During Shipping
Shipping parts to the lab while ensuring that no additional damage is introduced can be challenging. Wrapping cracked or corroded samples directly in plastic film (e.g., Plastiwrap) or paper is generally not recommended since it transfers plastic film or paper onto the sample surface, contaminating it.
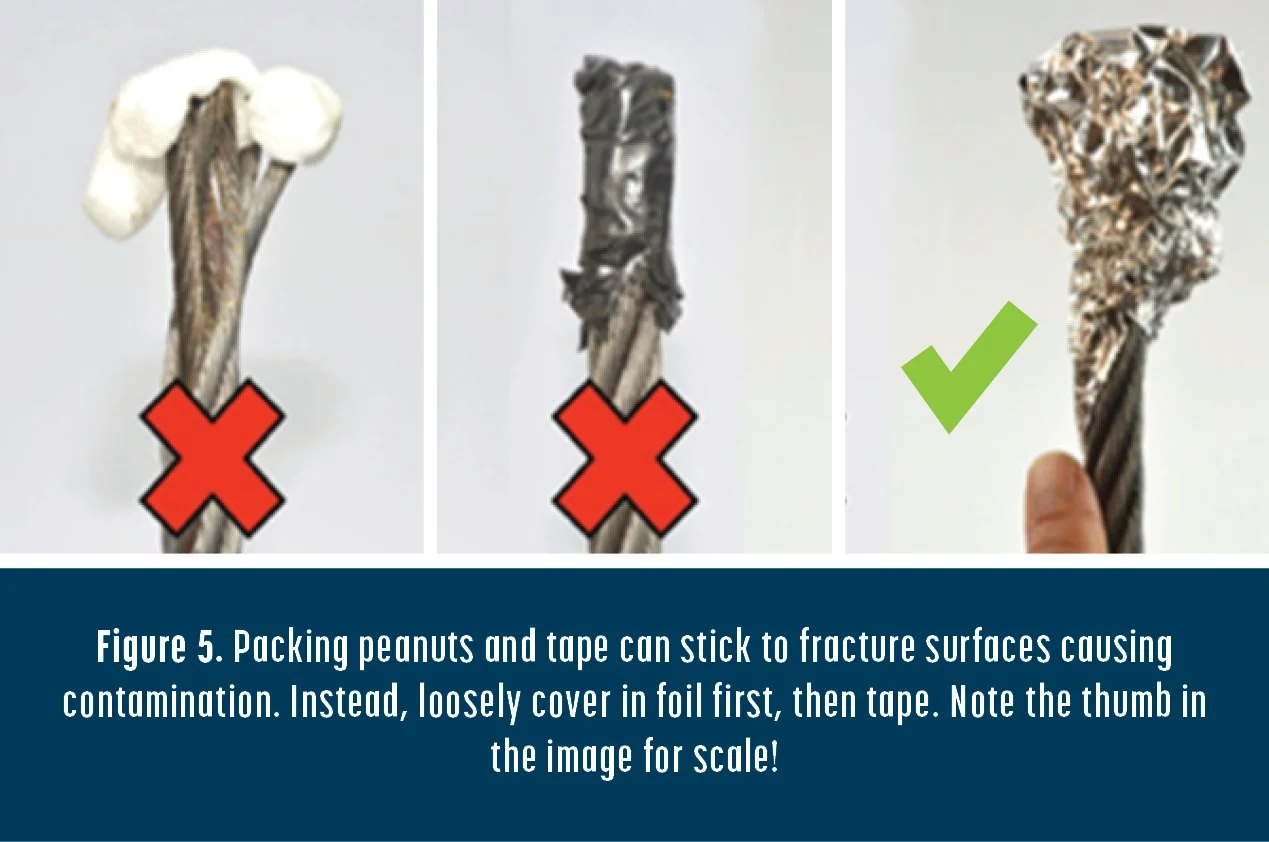
Applying tape near or on the fracture is also not recommended. It’s tough to get rid of and always leaves a residue. Packing peanuts or shredded paper can get into all kinds of openings on a component or become stuck within pipes, contaminating the fracture or corrosion products, as shown in Figure 5.
Try wrapping the fracture face with aluminum foil since it will not stick to the fracture. Once covered in aluminum foil, the component may be wrapped any way you like. Check that the pieces are properly packaged or fastened to a pallet so they don’t move around and collide during transportation.
If the boxed items are very heavy or sharp, clearly label the package for safety. Include a description (and ideally a photo) of what’s in the package so that any small parts aren’t jumbled up and lost with packing materials.
Step 9. Send an Example, if You Have One
If feasible, get an undamaged component or pipe segment for comparison with the failed sample. Having failed and ‘good’ pieces of a boiler tube, for example, may aid in determining if unusual service circumstances occurred in the failure area or if the tubes had manufacturing flaws.
In the case of corrosion failures, a tiny sample of the fluids the component or pipe came into contact with may be beneficial for analyzing their composition and determining contaminants (For example, fresh gearbox lubricant can be compared to the lubricant from the failed gearbox to assess its deterioration).
Step 10. Treat the Failure Analyst as a Member of Your Engineering Team
By including a failure analyst within your team as soon as a failure occurs, you can help make the analysis cost effective and productive. Have them visit the site, if possible. They may be able to conduct sample collection and documentation right there and then, as well as give you on-the-spot guidance about cutting and shipping.
Conclusion
We realize that these steps are not always practical in “the real world”. If nothing else, a key takeaway might be that if it fails, call a failure analyst for advice before going in there and cutting or removing things. It might save you a lot of headaches in the long run.
Viking Can Help
The Viking Laboratory provides evaluations, testing and analysis for assessing complex downhole, pipeline, pressure vessel, or any other critical structural component failures from any industry. We can also provide expertise from sample collection to courtroom expert witness testimony. In addition, we can help our clients avoid future problems by suggesting design modifications based on the failure causes.
The Viking Laboratory’s metallurgical failure analysts are backed up by a multi-disciplinary team of engineers. This enables us to solve some of the most complex failures.